Karaf First Steps
Write a simple Karaf OSGI Bundle with Eclipse in 10 Minutes Time

My Configuration
- 32 Bit Ubuntu with great Mate Desktop
- Oracle Java 8
- Eclipse Neon Standard J2EE Edition
- Apache Karaf 4.07
This Example can be importet as Eclipse Projekt from github.
Step 1 - Download and extract karaf
Download the last Stable Version.
I Use 4.07 for this example.
Apache Karaf 4.07
Extract the Zip to location of your Choice.
My path is /home/joern/Entwicklung/apache-karaf-4.0.7
Step 2 - Create a new Eclipse Project
- New Project
Select Maven Project
First we config a new archtype for Maven we need to do this only once.
select add Archetype and fill the Dialog as follows :
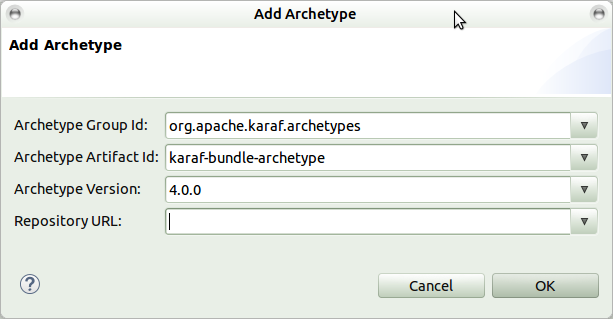
org.apache.karaf.archetypes
karaf-bundle-archetype
4.0.0
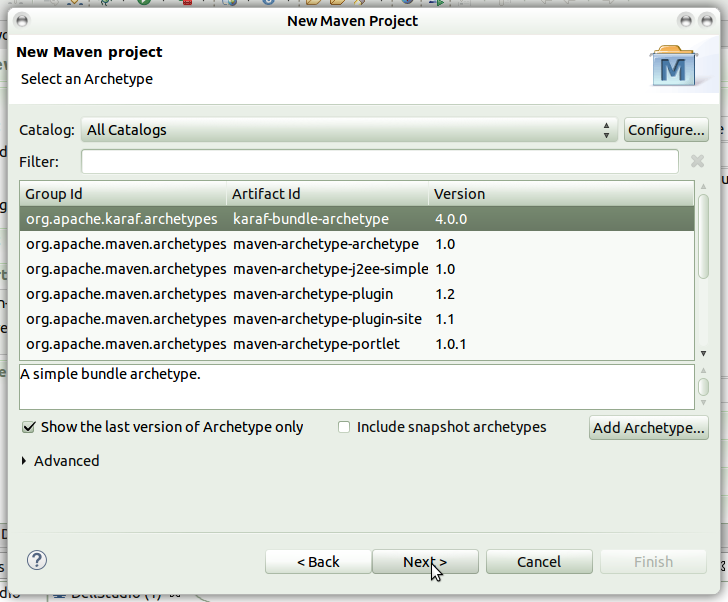
So now we can can choose the Karaf Bundle Archtype
and click Next.
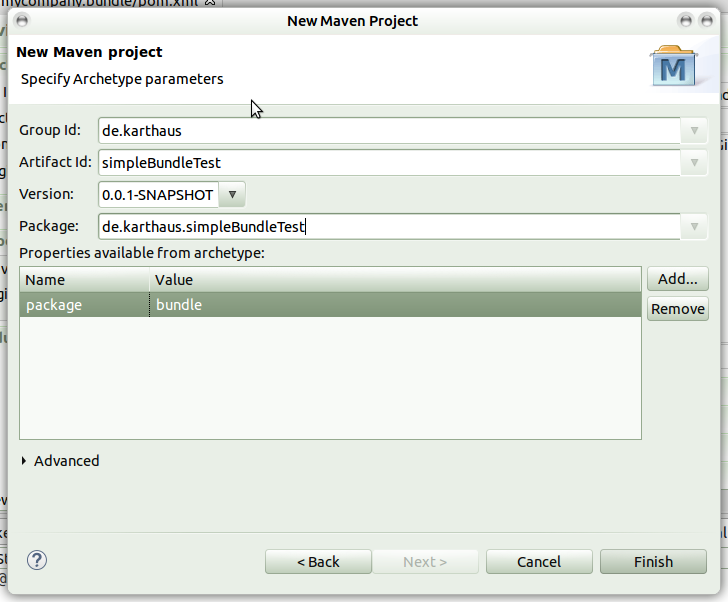
Fill the last Page from the Wizard as follows.
Step 3 implement some Code
So we add some Demonstration Code for this Brandnew Plugin.
I will demonstrate some usefull Config Stuff.
Karaf add coniguration for Servives automaticly.
First we add a OSGI Dependency in our POM
<dependency>
org.osgi
org.osgi.compendium
4.2.0
and make some Config in the build area
org.apache.felix
maven-bundle-plugin
${maven-bundle-plugin.version}
true
${project.artifactId}
${project.version}
de.karthaus.simpleBundleTest.Activator
de.karthaus.simpleBundleTest*;version=${project.version}
*
Next switch to our Activator Class and add some Code...
Implement another Interface (ManagedService) in the Activator
  public class Activator implements BundleActivator, ManagedService {
  	public void start(BundleContext context) {
		System.out.println("Starting the bundle");
	}

	public void stop(BundleContext context) {
		System.out.println("Stopping the bundle");
	}

	public void updated(Dictionary properties) throws ConfigurationException {
		// TODO Auto-generated method stub

	}

}
OK, now we add Code to register our Plugin in the OSGI Service Registry.
public class Activator implements BundleActivator, ManagedService {

	private static final String BUNDLE_ID = "SimpleBundleTest";
	private ServiceRegistration serviceReg;
	private Logger log = Logger.getLogger(this.getClass().getName());

	public void start(BundleContext context) {
		Hashtable<String, Object> properties = new Hashtable<String, Object>();
		properties.put(Constants.SERVICE_PID, BUNDLE_ID);
		serviceReg = context.registerService(ManagedService.class.getName(), this, properties);
		log.info("Starting Bundle " + BUNDLE_ID);
	}

	public void stop(BundleContext context) {
		log.info("Stopping Bundle " + BUNDLE_ID);
	}

	public void updated(Dictionary properties) throws ConfigurationException {
		if (properties == null) {
			log.info(BUNDLE_ID + " config not found  - Please give me a config File in Folder config");
			return;
		}
		log.info("mqttGpioActor Config was set.");
		log.info("Found " + properties.size() + " config Items.");
	}

}
Our great Simple Bundle is ready for Takeup.
Step 4 install the Bundle to your local Maven Repository
Create a new Maven Run Configuration.
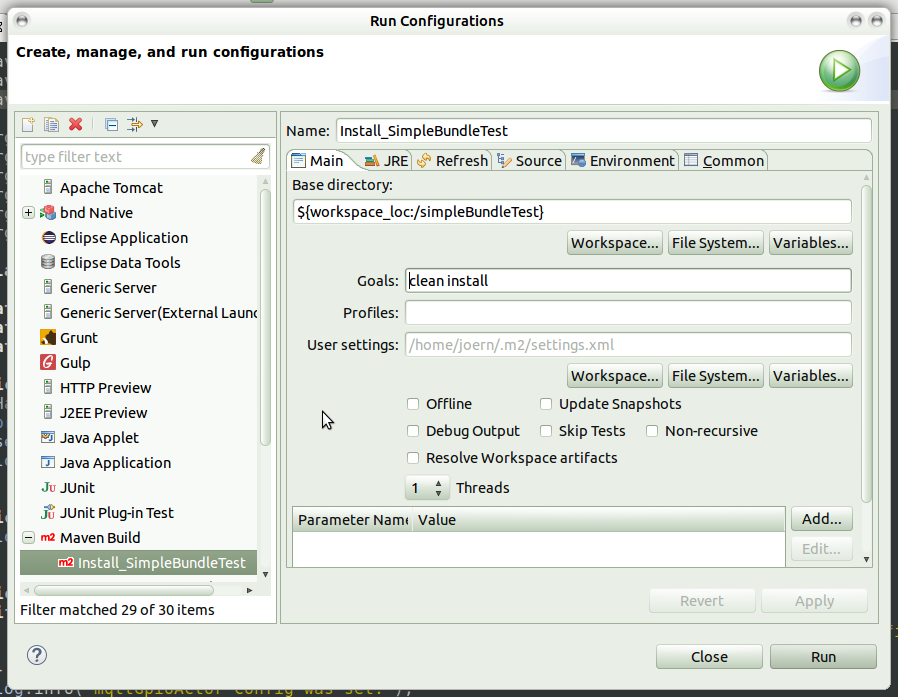
Our Bundle is now prepared to run inside Karaf.

Step 5 Install the Bundle to Karaf
Start Karaf in Debugging Mode by typing ./karaf debug in your KARF/bin Folder.
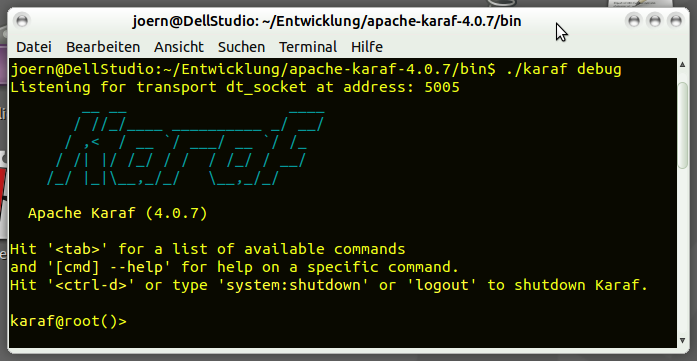
The second Line is important for our Remote Debugging Session that we
start in further Steps Karaf is listening on Port 5005
type list to see what Bundles are installed

Install our Bundle by typing ...
install mvn:de.karthaus/simpleBundleTest/0.0.1-SNAPSHOT

Step 6 Start the Bundle
start 69
69 is the Bundle ID on my System it can be different on your System.

OUR BUNDLE IS UP AND ALIVE

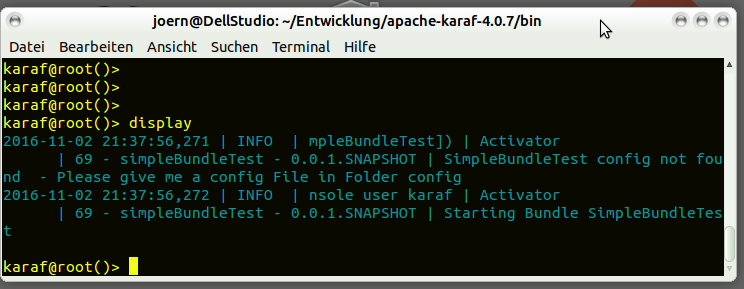
Step 7 Watch Karaf log
the karaf command display display the log
Step 8 Watch Bundle

**watch * ** means that karaf watches all Bundles that machtes Version Snapshot
When you run our Eclipse Build Script - the magic begins and Karaf update you
Bundle automaticly.
Step 9 Remote Debugging
In Step 5 we startet Karaf with the debug Parameter.
Start a Eclipse Remote Degugging Session to use this.
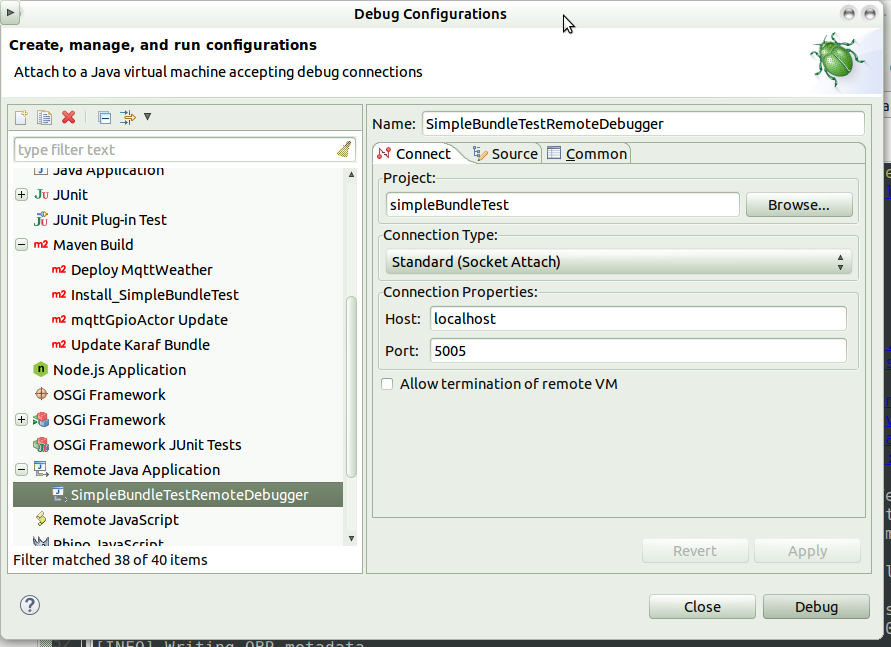
Set a breakpoint and start a Remote Debugging Session.
Maybe these 9 Steps are usefull for you to get startet with Eclipse and Karaf

Links
Karaf Documentation and Tutorials
Diskussion in Mailing List about EIK E clipse I ntegration K araf EIK